How To Secure Akka Serverless Apps With Auth0
Dive into the power of secure serverless applications! 🚀 Explore how to seamlessly integrate Auth0 with Akka Serverless in my latest blog post. Empower your coding journey with step-by-step instructions and code snippets.

As Auth0 says on their website “Identity is the front door of every user interaction”. As you’re building our new serverless applications, that becomes even more important as you have multiple apps that you need to secure. In this blog post I’ll walk you through how that can work in Akka Serverless.
TL;DR all code is avaialble on GitHub too: https://github.com/retgits/akkaserverless-auth0-javascript
Prerequisites
To follow along with this blog post, you’ll need to have:
- An Akka Serverless account
- Node.js v14 or higher installed
- The Docker CLI installed
- An account with Auth0
Your service
To show how to connect Auth0 and Akka Serverless, I’ll build a straight-forward “Hello, World” Action that validates a JWT token and returns an error (HTTP 500) or a normal response.
Proto file
Akka Serverless is an API-first platform, so I’ll start with the API description (in Protobuf format) first:
syntax = "proto3";

package com.retgits.akkaserverless.actions;

import "akkaserverless/annotations.proto";
import "google/api/annotations.proto";

message GreetingRequest {
    string name = 1;
    string greeting = 2;
}

message GreetingResponse {
    string message = 1;
}

service GreetingService {
    /**
     * The Greeting method accepts a GreetingRequest message and returns a
     * GreetingResponse message if the function completes successfully. The
     * method is exposed to the outside world over HTTP on the URL `/greet`
     */
    rpc Greeting(GreetingRequest) returns (GreetingResponse) {
        option (google.api.http) = {
            post: "/greet"
            body: "*"
        };
    }
}
The next step is to make sure the JWT token can be validated. I’ve built an extra class to do so:
import jwksClient from 'jwks-rsa';
import jwt from 'jsonwebtoken';

class JWTValidator {
    header
    client

    /**
     * Creates an instance of JWTValidator
     * @param {string} header the name of the header parameter that contains the JWT token
     * @param {string} uri the URI to find the JWKS file
     */
    constructor(header, uri) {
        this.header = header;
        this.client = new jwksClient.JwksClient({
            jwksUri: uri
        });
    }

    /**
     * Validate and decode the JWT token
     * @param {*} metadata the metadata of the Akka Serverless request
     * @returns a decoded JWT token
     * @throws an error when decoding fails
     */
    async validateAndDecode(metadata) {
        const jwtHeader = metadata.entries.find(entry => entry.key === this.header);
        const token = jwtHeader.stringValue;

        let result = jwt.decode(token, { complete: true });
        if(result == null) {
            throw new Error('Unable to obtain valid JWT token')
        }

        const kid = result.header.kid;

        if(this.client == null) {
            throw new Error('To validate with JWKS the withJWKS method must be called first')
        }
        const key = await this.client.getSigningKey(kid);
        const signingKey = key.getPublicKey();

        try {
            var decoded = jwt.verify(token, signingKey, { complete: true });
            return decoded
        } catch (err) {
            throw new Error('Unable to verify JWT token');
        }
    }
}

export default JWTValidator;
And finally, the implementation of the action
import as from '@lightbend/akkaserverless-javascript-sdk';
import JWTValidator from './jwtvalidator.js';

const greetingservice = new as.Action(
    ['./app.proto'],
    'com.retgits.akkaserverless.actions.GreetingService',
    {
        serializeFallbackToJson: true
    }
);

/**
 * The command handlers for this Action.
 * The names of the properties (before the colon) must match the names of the rpc
 * methods specified in the protobuf file.
 */
greetingservice.commandHandlers = {
    Greeting: generateGreeting
}

/**
 * generateGreeting implements the business logic for the Greeting RPC method. It
 * validates the JWT token passed in the `X-Custom-JWT-Auth` HTTP Header parameter
 * first and if that succeeds, sends back a message. If the validation fails. an
 * HTTP 500 error is sent back.
 * @param {*} request
 * @param {*} context
 */
async function generateGreeting(request, context) {
    const validator = new JWTValidator('X-Custom-JWT-Auth', 'https://<your tenant>.auth0.com/.well-known/jwks.json');
    try {
        await validator.validateAndDecode(context.metadata);
        return {
            message: `${request.greeting}, ${request.name}!`
        }
    } catch (err) {
        return context.fail(err);
    }
}

export default greetingservice;
The first line of the generateGreeting method is quite important. It initializes the JWT validation class with two parameters:
- The name of the HTTP Header parameter which will have the JWT token
- The URL to the JWKS file in Auth0
const validator = new JWTValidator('X-Custom-JWT-Auth', 'https://<your tenant>.auth0.com/.well-known/jwks.json')
Security
So far the creation of the service was pretty straight-forward. Securing it with Auth0 is really straight-forward too!
In the Auth0 console, click on Applications -> APIs:
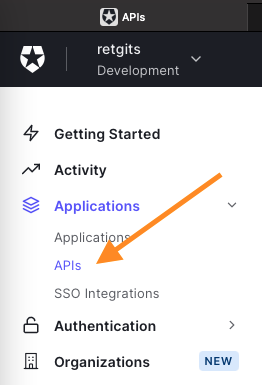
Click on + Create API to create a new API. The name and identifier don’t matter as much, but Signing Algorithm should be set to RS256 to make sure tokens will be signed with Auth0’s private key. Once the API is created, a new Test Application is created too. On the Test tab, you can ask Auth0 for tokens for any of your authorized applications (like the Test Application that was created by default). The response section will show the access_token.
Testing it
To test your service locally, you’ll need to run the proxy on your own machine together with the container for your service:
## Set your dockerhub username
export DOCKER_REGISTRY=docker.io
export DOCKER_USER=<your dockerhub username>

## Run the npm install command
npm install

## Build container
docker build . -t $DOCKER_REGISTRY/$DOCKER_USER/akkaserverless-auth0-javascript:1.0.0

## Create a docker bridged network
docker network create -d bridge akkasls

## Run your userfunction
docker run -d --name userfunction --hostname userfunction --network akkasls $DOCKER_REGISTRY/$DOCKER_USER/akkaserverless-auth0-javascript:1.0.0

## Run the proxy
docker run -d --name proxy --network akkasls -p 9000:9000 --env USER_FUNCTION_HOST=userfunction gcr.io/akkaserverless-public/akkaserverless-proxy:0.7.0-beta.9 -Dconfig.resource=dev-mode.conf -Dcloudstate.proxy.protocol-compatibility-check=false
Using the access_token, you can call the service:
## Set your Access Token
export ACCESS_TOKEN=<your access token>

## Send a request
curl --request POST \
  --url http://localhost:9000/greet \
  --header 'Content-Type: application/json' \
  --header 'X-Custom-JWT-Auth: '$ACCESS_TOKEN'' \
  --data '{
    "name": "World",
    "greeting": "Hello"
}'

## The result will be
{"message":"Hello, World!"}
If you change the token to anything else, you’ll get an error:
Error: Unable to obtain valid JWT token
What’s next?
As you can see, securing Akka Serverless apps with Auth0 is pretty straight-forward. Let me know what you want to see next, or what you want us to build next!
Cover photo by vishnu vijayan from Pixabay