How To Build a Slack Bot Powered By Project Flogo
Dive into the world of Slack bots! Explore the swift creation of a cat-facts bot using Flogo. From Git cloning to Lambda deployment, infuse your collaboration hub with feline fun. Ready to talk bots?
Let’s talk (to) bots! In this case I’m not talking about the awesome autobots, that save the world from Megatron, but Slack bots that help people collaborate and introduce a little fun! Several weeks ago Slack published an article about building the modern collaboration hub and how that hub makes sure that people can interact with each other and their data. On the Internet, everyone loves interaction… and cats, so let’s build a Slack bot that provides your Slack instance with a bit of cat facts!
Let’s get you up and running with a Slack bot as fast as possible!
What you’ll need
You’ll need a few things before we get started:
- Git
- The flogo cli (
go get -u github.com/TIBCOSoftware/flogo-cli/...) - An AWS account with access to Lambda and API Gateway
If you want to make a few changes to the app before deploying it to Lambda, you can always do that using the Flogo Web UI (just run docker run -it -p 3303:3303 flogo/flogo-docker:latest eula-accept to start it). Just make sure you also install the QueryParser activity.
Clone
To get started we’ll clone a git repository containing the template for the app, and a SAM template. The latter one you can use for an optional step to test the app locally.
$ git clone [https://github.com/retgits/flogo-slackbot](https://github.com/retgits/flogo-slackbot)
$ cd flogo-slackbot
What are we building?
Good question! We’re building a Slack bot that will respond to a “slash command” called /cat. It will have the ability to respond in a few different ways, depending on what you type. If you load the slack_cat.json file into to the Flogo Web UI, you’ll see the below flow:
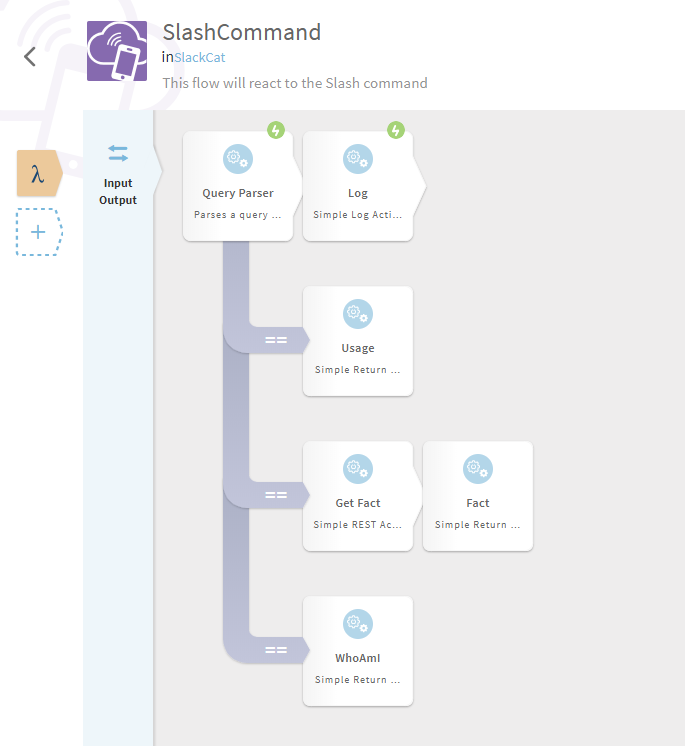
This is what the flow looks like in the Flogo Web UI
As you can see there are three branches, that each behave differently, based on the word you type after /cat. From top to bottom the branches react to the word:
- usage: This flow will show what you need to type to get a result
- fact: This flow will get a random cat fact and display it in the Slack channel you’re in
- whoami: This flow will simply respond with your name
The text responses we’re sending back can be found on the following lines:
- usage: Line 121
- fact: Line 156
- whoami: Line 173
If you want to make changes, I’ll wait here until you’re ready. Once you’re done, simply export the app using the “export” option on the app screen.
Create an executable
Great! We’re of to a flying start (bird joke)… First we need to turn the JSON file into an executable, and to do that we’ll need to run a few commands in the terminal:
# Create the app structure in a folder called slackcat
$ flogo create -f slack_cat.json -flv github.com/TIBCOSoftware/flogo-contrib/action/flow@master slackcat
$ cd slackcat

# Create an executable that can be uploaded to AWS Lambda
$ flogo build -e -shim lambda_trigger
Test your app with the Serverless Application Model (optional)
If you want to test your app without pushing it to AWS yet, you can do that using the AWS SAM CLI. This cli is a tool for local development and testing of Serverless applications. If you haven’t installed it yet you can do so by following there instructions here.
In the sam folder you’ll see six JSON files and one YAML file. The YAML file is the SAM template that is used by the SAM CLI so it knows what to do. The JSON files are the input events the app will use. You’ll notice that each of the commands appears twice, like:
- usage.json: A simple test event for the usage flow
- apiusage.json: An event that represents a request coming from an API Gateway for the usage flow
To test your app using SAM Local you can run
cd sam
cp ../src/slackcat/handler ./handler
sam local invoke "SlackCat" -e <event name>.json
For example, if you want to see the response that your app would create if it got a request for a cat fact from an API Gateway you can run:
$ sam local invoke "SlackCat" -e apifact.json

2018–06–06 16:21:00 Invoking handler (go1.x)

2018–06–06 16:21:00 Starting new HTTP connection (1): 169.254.169.254

Fetching lambci/lambda:go1.x Docker container image……

2018–06–06 16:21:03 Mounting /Users/lstigter/go/src/github.com/retgits/flogoapps/slackcat/sam as /var/task:ro inside runtime container

START RequestId: 70a6515a-6dbe-169e-a7b0-dccabc2ae1e1 Version: $LATEST

2018–06–06 23:21:03.891 INFO \[trigger-flogo-lambda\] — Starting AWS Lambda Trigger

2018/06/06 23:21:03 Starting AWS Lambda Trigger

2018/06/06 23:21:03 Received evt: ‘map\[resource:/{proxy+} headers:map\[X-Amz-Cf-Id:cDehVQoZnx43VYQb9j2-nvCh-9z396Uhbp027Y2JvkCPNLmGJHqlaA== CloudFront-Forwarded-Proto:https Accept-Encoding:gzip, deflate, sdch X-Forwarded-Port:443 CloudFront-Is-Tablet-Viewer:false CloudFront-Is-Desktop-Viewer:true CloudFront-Is-SmartTV-Viewer:false CloudFront-Viewer-Country:US Accept:text/html,application/xhtml+xml,application/xml;q=0.9,image/webp,\*/\*;q=0.8 Host:1234567890.execute-api.us-east-1.amazonaws.com X-Forwarded-Proto:https Cache-Control:max-age=0 Via:1.1 08f323deadbeefa7af34d5feb414ce27.cloudfront.net (CloudFront) Accept-Language:en-US,en;q=0.8 X-Forwarded-For:127.0.0.1, 127.0.0.2 Upgrade-Insecure-Requests:1 CloudFront-Is-Mobile-Viewer:false User-Agent:Custom User Agent String\] httpMethod:POST pathParameters:map\[proxy:path/to/resource\] stageVariables:map\[baz:qux\] path:/path/to/resource body:token=SlackToken&team\_id=TEAMID&team\_domain=TEAMNAME&channel\_id=CHANNELID&channel\_name=general&user\_id=USERID&user\_name=sam&command=%2Fcat&text=fact&response\_url=URL&trigger\_id=TRIGGERID requestContext:map\[accountId:123456789012 identity:map\[cognitoIdentityId:<nil> sourceIp:127.0.0.1 accountId:<nil> apiKey:<nil> caller:<nil> userAgent:Custom User Agent String user:<nil> userArn:<nil> cognitoAuthenticationType:<nil> cognitoIdentityPoolId:<nil> cognitoAuthenticationProvider:<nil>\] stage:prod resourceId:123456 apiId:1234567890 resourcePath:/{proxy+} httpMethod:POST requestId:c6af9ac6–7b61–11e6–9a41–93e8deadbeef\] queryStringParameters:map\[foo:bar\]\]’

2018/06/06 23:21:03 Received ctx: ‘map\[functionName:test functionVersion:$LATEST logGroupName:/aws/lambda/test logStreamName:2018/06/06/\[$LATEST\]bd8551becbc9385a79493b4c55b8618d memoryLimitInMB:128 awsRequestId:70a6515a-6dbe-169e-a7b0-dccabc2ae1e1\]’

{“statusCode”:200,”headers”:null,”body”:”:wave: \\u003c@sam\\u003e, did you know that Polydactyl cats are also referred to as \\”Hemingway cats\\” because the author was so fond of them.”}

END RequestId: 70a6515a-6dbe-169e-a7b0-dccabc2ae1e1

REPORT RequestId: 70a6515a-6dbe-169e-a7b0-dccabc2ae1e1 Duration: 468.43 ms Billed Duration: 500 ms Memory Size: 128 MB Max Memory Used: 12 MB
Hmm, interesting… I didn’t know that Polydactyl cats are also referred to as “Hemmingway cats” because of the author. 😸
Deploy to Lambda
The app is built, and tested, so you’re ready to deploy it to AWS Lambda. While there are many ways to deploy to Lambda, let’s do it manually and see what the steps are that frameworks automate for you.
From the Lambda console, click “Create function” (the big orange button). You can choose your own name and IAM role, though the runtime must be set go Go 1.x. If you’ve used Lambda before and want to stick with the default options:
- Name: SlackBot
- Runtime: Go 1.x
- Role: Choose an existing role
- Existing role: lambda_basic_execution
Click on “Create function” to go to the main configuration screen of your Lambda function. Scroll slightly down to where it says Function code and use the upload button to upload a zip file. The zip file you need is in the directory src/slackcat and is called handler.zip. In the field Handler, replace hello with handler and click on “Save” at the top of the screen.

This is what the Function Code section would look like
If you want to test your code, you can configure a new test event and simply copy/paste the content of any of the JSON files in the SAM folder.
Configure the API Gateway
Now you just need to make sure that your function is accessible from the outside world and to do that you can use the API Gateway. When you scroll back up, you’ll see a section that is called Add triggers and the top option is API Gateway.
Click on that to add a new API Gateway trigger to your Lambda function. You can now configure your API Gateway. For now let’s go with the default settings, but be aware that you usually want to have a bit more security! The default settings are:
- API: Create a new API
- API name: SlackBot
- Deployment stage: dev
- Security: Open
Especially the Security is something you want to look at before using this in production!
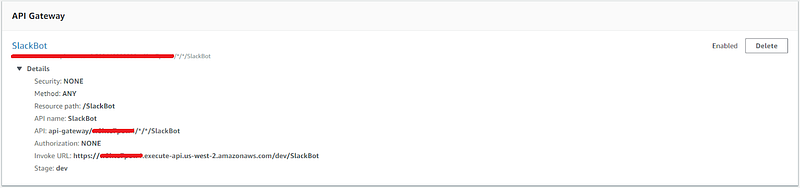
Click “Add” and “Save” to add the API Gateway configuration and deploy your gateway as well. The same section of the page will now show your API Gateway with a dark triangle in front of it. Click that to see the details of your Gateway, and pay attention to the “Invoke URL”
Create the Slack Bot
The final step is to make the bot available in Slack. Let’s go over to the Slack apps page https://api.slack.com/apps. On this page, there is a big green button that says “Create New App”.

The “Your Apps” screen with the “Create New App” button
Click that and give your app a name and select a workspace to test it in and click “Create App”
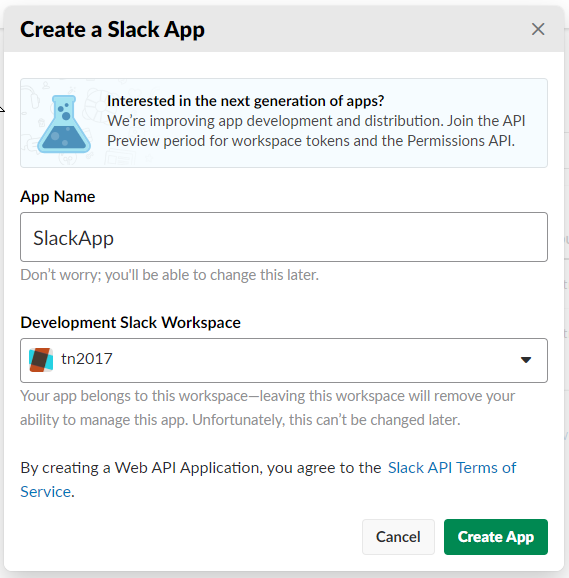
The Create App screen
Now you can set up the Slash command, simply by clicking on the “Slash Commands” button and on the next page click on “Create New Command”. On this page you can configure your new command. Let’s use some defaults:
- Command: /cat
- Request URL: this will be the invoke URL from your API Gateway
- Short Description: 🐱
- Usage Hint: usage
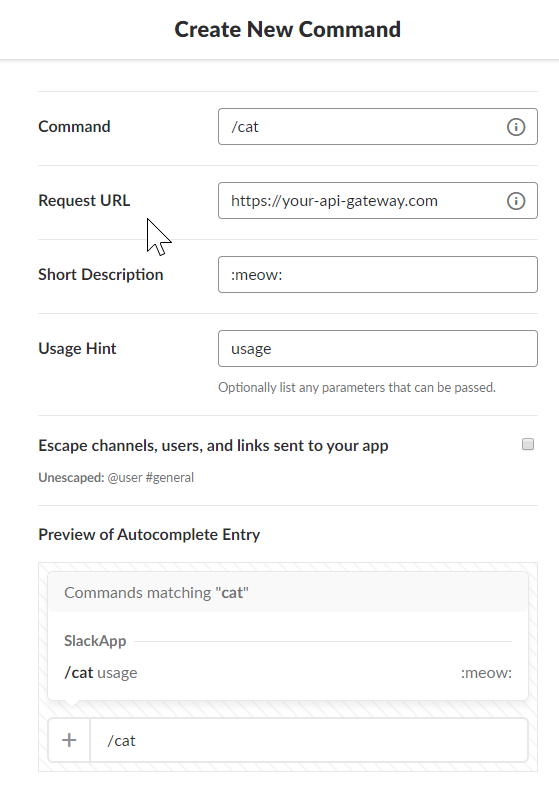
This could be your command :)
Now, click the green “Save” button at the bottom right of the screen.
Head over the the “Install App” section where you can install the Slack bot into your workspace. By clicking the big green “Install App to Workspace” button and clicking on “Authorize” after that, you’ll make the app available in your Slack workspace.
Test!
Okay! Let’s see what we got here…
- Created a bot ✔️
- Deployed to Lambda ✔️
- Added API Gateway ✔️
- Created the Slack app ✔️
So you’re ready to go and test! Within your Slack workspace you can now type /cat with any of the commands above and see the result. The result will look like

Hmm, again I didn’t know that… 🙀
If you end up building an exciting Slack bot using Flogo, or if you have questions let me know here or shoot me a Twitter message @retgits